Winning By O-Strich

This is real.  I kid you not.  And this year, I'll be there.... come hell or high water!

Ostrich Races Nevada

In Virginia City, Nevada, over Labor Day weekend, mere mortals will race on Ostriches, Camels and even Zebras!  Say what?! Say Swiss Family Robinson, that what!!   Did you know such a thing existed outside of the movies... and in the United States no less?  I did not. And I am FLABBERGASTED.  I don't know if I would have been phased if someone had told me such an outlandish tale about the goings on in say, Dubai.. but in California's backyard.. NO WAYYY!

Zebra Racing Nevada Camel Races

But actually, totes WAY.. And as if that wasn't outrageous enough, anyone can race on these animals... For a fee, of course.. But still.  

Camel Races Reno Nevada

Have a gander at this video if you don't believe me:

To gain entry into the race, you have to become a sponsor... Which, I am thinking: How great of a sponsorship opportunity would this be for KEELEY KRAFT?!  It's like a match made in heaven!  That's just the kind of bizarre endeavor that this brand is destined for.  And anyone WILD enough to watch these wild animals and equally crazy jockeys go for the gold, is EXACTLY the kind of reader I aim to reach.   I've officially started saving.. because APPARENTLY you have to drop more dough to ride the ostriches (I think only professionals can ride the zebras) than the camels.. And not to sound like a TOTAL SNOB, but I have already ridden a camel.. And those humps made my hiney hurt for a good 2 days.. And I mean, ostriches seem more fluffy and padded, am I right?  Haha, I still can't even get over the words that are showing up on the screen as I write this.. Pure insanity!

Ostrich Race Nevada Arizona

So if you want to watch Keeley Kraft take it all in the ostrich finals... and win by o-strich, the International Camel Races take place September 5 - 7, 2014 in Virginia City, Nevada.  Mull on it.  And also, have an outstanding weekend!

Related Posts Plugin for WordPress, Blogger...

Hashtag Coats

I'm pretty sure I've already posted about this before but it's buried so deep in the archives of this blog that even I can't find it... So, me thinks that makes it safe for me to post about it again.  If you already read it the first time, well.. I think you can acknowledge why I'm deeming it funny enough to talk about twice....  What I'm referring to, is the topic of Burlington Coat Factory's Twitter page.  If you're a fan of offbeat humor, then you will no doubt be able to appreciate this impressively odd marketing platform that is nothing if not outright hilarious.  THIS ARTICLE, which it seems can be credited with finding this gem of an account, will explain the rest... Please, enjoy.

In other news... about #coats... This coat is RIDICULOUSLY cheap.  

Find it here

Find it here

I found it by clicking on a Facebook ad.  Can you believe it?  I surprised myself by clicking and then the surprise escalated when I saw that it was a mere $18!  B-A-R-G-A-I-N. I have a HUGE coat problem (oh excuse me, #coatproblems), which is borderline ludicrous considering I live in Southern California.  It's so bad that I have had a spending hold placed on me by my loved ones for anything that vaguely falls under the #coat umbrella. Therefore, I, under any circumstances, cannot buy this very cute and even better priced outerwear item.. but that doesn't mean you can't!  In fact, you SHOULD.. and then tell me about it so I can revel in that new coat feeling vicariously through you.  Sound like a fair deal in exchange for me telling you about this insane steal?  Ok cool.

Sorry that's all I've got for you today.  It's been a long day.  But hey, tomorrow's Friday, and I don't know anyone who doesn't get excited at the sound of that!  So on that note, peace out my pretties!

Related Posts Plugin for WordPress, Blogger...

Red All Over

Today on here I am going to expose the second aspect from the room I posted about on Monday, that I transformed.  This element is definitely a DIY project but it's also a Before and After and was contingent upon finding the right piece to make the whole thing go.  So with out further ado, the piece I'm talking about is:

THE RED CREDENZA

I suppose we could also call it a sideboard, buffet, entertainment center (since that's what it's being used for here), or chest/dresser.  Either way, this piece of furniture looked VERY different when it first came to live with me.  I bought it off Craigslist from the coolest couple.  The girl who sold it to me actually has a business of selling sweet furniture that she finds from thrifting, estate sales, garage sales, and the like and then tries to resell it (which means I definitely paid more for it than she probably found it for :) but I'm still excited about the deal I got.  She is also an interior designer and has a business with her sister called The Property Sisters where her sister does construction renovation and she goes in after and adds her magic interior designer fairy dust.  Hmmm... Something about that seemed strangely familiar... I wonder why? ;)

Anyway, THIS is what the piece looked like when I bought it from her:

I mentioned in my first post about my living room, here, that I really wanted a glossy red TV stand/entertainment center to go in the space and once I had put it in writing, the wheels had already started turning and there was no going back.  Therefore, when I saw Little Green Notebook's* blog post on painting one yourself (and it actually turned out looking good) I decided that was the only way I was going to get my dream piece.  

*Sidenote: if you don't already know about Little Green Notebook blog, it is like the mecca of all things DIY.  I once spent 4 hours just reading a bunch of her posts.  Good stuff, people.

Basically, this entire project can be completed with a basket full of these puppies:

Found at Home Depot... where else?

Found at Home Depot... where else?

And frankly this:

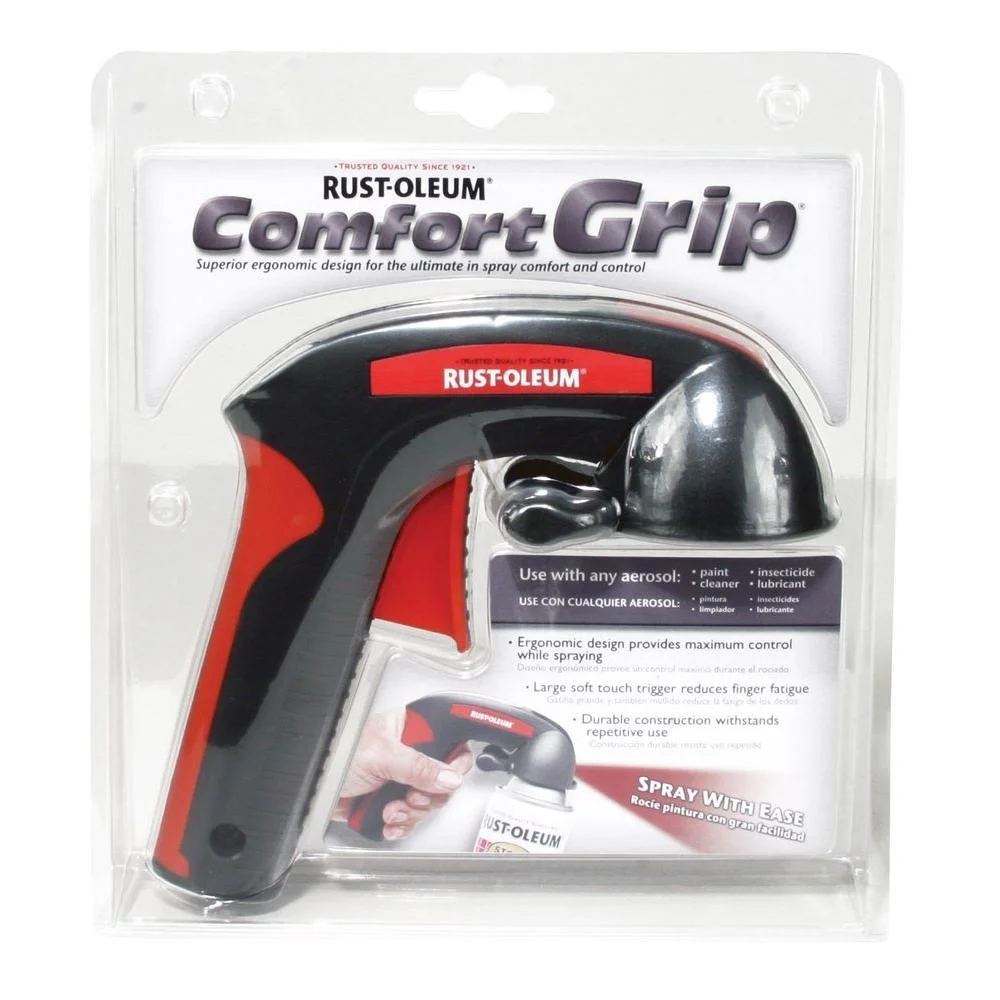
Home Depot Comfort Grip Spray Paint Tool Gun

It's $6.99 at Home Depot and is seriously the best thing since sliced bread.  And since a lot of other really cool innovations as well.  This tool has been revolutionary for me, it makes spray painting SUPER easy and I definitely could not have completed a project of this scale without it.  I mean, there's no way.  An index finger lifesaver.

So... those crazy red cans of paint are going to give you this fire engine red color.   But DO ME A FAVOR and make sure to put down drop cloths (can be plastic) anywhere the eye can see.  This stuff loves to travel.  Keep it on the DL but when I painted this piece, I thought I had ample "protection" and after I was finished, my entire concrete carport area had a pink film layer on it... and I'm a renter.  I was frantically looking into renting a power washer, which would have eliminated any of the economic benefits I thought I was getting out of this project.  THANKFULLY, with the help of my amazing roommate, who found me on my hands and knees sanding every inch of our concrete driveway, we were able to get it up with a heavy duty mop and a hose.  PHEW is all I can say on that.  So be careful and make sure every inch is covered because this color does not exactly "blend in." 

"Oh SHIT!"  This photo was taken at that moment when... you start having a heart attack... I probably shouldn't even be showing this to you guys but... it's all cleaned up now so, no matter :)  But keep your mouths shut, ok??  All in …

"Oh SHIT!"  This photo was taken at that moment when... you start having a heart attack... I probably shouldn't even be showing this to you guys but... it's all cleaned up now so, no matter :)  But keep your mouths shut, ok??  All in all, my drop cloths were pretty useless.. so, don't make the same mistake I did.  And that's why I'm showing you all this photo. 

After I had painted it (and it had dried) it definitely didn't have that sheen that I was hoping for.  I don't know if Jenny did something to her's after she spray painted it with the Rustoleum but... she must have because this particular paint just isn't that glossy.   Luckily for me, my dad had a paint spray gun and we (my dad and I) got a can of clear glossy paint that w̶e̶ he sprayed onto the credenza after we sanded it (with a light 120 grit sandpaper).  It needed to be sanded quite a bit as my spray paint job was no where near even and it showed.  

Red Dresser.jpg

Those plastic drop cloths look straight out of Dexter.  Eek!

It actually took about 4 coats of the clear glossy top coat but I'm so glad we added as many as we did because with each additional coat it just got glossier and the finish became stronger and more durable.  AND, if I do say so myself, the top of it looks like glass.  What IS it about a lacquer coat that is so yummy?!?!  Painting the clear coats on the piece took a long time because it takes a while for the coat to dry before you can add another one... like several hours, so it turned it into a multiple day project.  You also need to be careful to stand a far enough distance away and quickly but evenly go over every part of the piece so that the paint doesn't get too thick in some areas and then begin to run.  If it does start to run (and it will) just wipe the whole area off with a paper towel right away before it starts to dry and then go over it with the gun again, so you get an even spray.

Glossy Red Entertainment Center.jpg

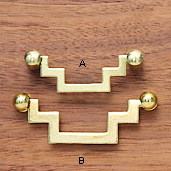
After the paint process was finished, I added these two types of hardware to it and then no joke, started squealing.  

Gold Hardware Nest Studio
Lee Valley Tansu Brass Box Gold Hardware

I think it turned out perfect and makes such a statement.  

I was also able to take out drawers that were on the inside of one of the doors and put the TV entertainment equipment in there.  Snazzy!

Keeley Kraft officially LOVES IT!

Related Posts Plugin for WordPress, Blogger...

Seeing Stripes

Welcome back to the blog today!  If you missed yesterday's post, you should probably go back and read it because it was awesome (duh) and also because this post is an extension of it.  I mean, if you feel like it, of course :). If you're tuning back in with baited breath, you can relax now because I'm just going to jump right in here and not even make you work for the big reveal... And, go....

My hope is that you could not figure out which elements of the room [I posted about yesterday], that I had made my "projects" because the quality appeared so professional!  And in going with the assumption that that is true, I will henceforth reveal the first DIY project element and flabbergast you.  It was:

THE STRIPED CURTAINS

(Cue: "Oohs" and "Ahhs")

Impressed? I knew it. :)

Anyone that's ever considered putting custom drapery in a room knows that curtains can get EXPEEEENSIVE.  I had had this nagging vision that I wanted green and white striped curtains in this room and I wanted the green to match the army green on the chairs I had reupholstered.  When my mind settled on the idea, it suddenly seemed as if NOTHING ELSE would do.  Since I knew that exact thing within my teeny tiny budget was going to be next to impossible to find, I quickly found myself spiraling down a rabbithole of hopeless brainstorming and strangely but miraculously came out with a plan (that is not normally how my design inspiration happens but in this case, that's truly how it felt):

By some insane twist of fate, I came across this brilliant idea on the interwebs about painting stripes on paint drop cloths and turning them into curtains.  SHEER GENIUS!  I wish I could take the credit for being THAT creative but... I would feel too guilty and then the credit wouldn't be worth it :).  But, nonetheless, it was the perfect solution to my nagging need: an affordable option AND it offered the ability to color match the paint to the fabric on the chairs (using Home Depot's trusty color match computer tool).  Problemo solved-o.

So here is my step by step process of how to create your own Striped Drop Cloth Curtains (.... Home Depot probably needs to stock up on canvas drop cloths STAT after this post drops :):

First I measured the window/door heights AND the ceiling height.  (As you may recall from my "Breaking Bad Design" post, you should try to hang your curtains closer to the ceiling as higher curtains will make the room feel taller).  

I then found Home Depot's best fitting CANVAS drop cloths based on the sizes I had measured - I went with 6' wide and then had my tailor hem both of the other ends with a 3" wide "fold-over" hem on each of the other ends to match my ceiling/floor measurements (I subtracted only about 2.5 inches down from the ceiling to account for the rod and ring height and to add about a 0.5" drag on the floor - which was based on personal preference :)

After that, I bought the following supplies at the ol' H.D.:


BLUE PAINTERS TAPE
(1.5" - the thicker the better as it will give you a better margin for error (literally) when painting)

LATEX PAINT IN THE COLOR OF YOUR CHOICE
(I got a gallon for 4 curtain panels - which was probably about 1/2 a gallon too much)

FABRIC MEDIUM
(this stuff I actually had to get at Michael's, they do not sell it at Home Depot - it goes into the paint so that your paint doesn't crack once it dries on the fabric.  You will need about 
3 parts latex paint to 1 part fabric medium - it comes in very small bottles at Michaels, so don't be alarmed when you're walking out of there with about 10 bottles, if you're painting four panels)
FOAM ROLLER - 4" SIZE
2 REPLACEMENT FOAM ROLLER CYLINDERS - 4" SIZE
PAINT TRAY
PAINT MIXING STICK

(should be $FREE.99)
PAINT MEASURING BUCKET 
(for mixing your paint and fabric medium)
TAPE MEASURE/RULER
PENCIL
BUTCHER PAPER OR PLASTIC DROP CLOTHS

(drop cloths for your drop cloths)

Next, I laid out butcher paper on the ground so that my curtains wouldn't get dirty and so that any paint that bled through the fabric wouldn't get on the ground.  Ideally, the drop cloth would hold the paint but given the massive amount of paint that we applied, a lot soaked through.  The butcher paper protected the floor from any bleed through. 

I then taped the canvas drop cloths to the floor, making sure to stretch them out as much as I could to create a flat surface, free of most wrinkles and guarantee that the fabric stayed in place during the painting.

After that, I measured out where I wanted my stripes.  I measured 3" down from the top of the curtain and then measured 9" stripes with 12" in between each stripe.  I made marks on each side of the curtain for where the stripes were and then, with the help of my "assistant," we carefully stood on each side of the curtain and brought a line of painters tape to the edge of the mark, pulling the tape taut, to almost snap the tape down and create a straight line.  It seemed to work pretty effectively for creating a straight line. 

After I had laid out all of my tape, I measured out my paint and the fabric medium (3 parts latex paint to 1 part fabric medium) in my paint measuring bucket, mixed it together, and poured it in my paint tray.  I kept a large sheet of butcher paper underneath my paint tray as I worked, in case there was any spillover when bringing the roller out of the tray (which there was).

Before I got to painting, I went over each of edges of the tape lines with my fingers, pressing down hard to make sure there were no air pockets in the tape where the paint could seep through.  I cannot stress this enough because even though I thought I did a good job of this, I missed some spots and the paint went under the tape, compromising the perfectly straight line (which being the perfectionist that I am - KILLED ME).  So don't make the same mistake I did - make sure that shit is pressed down!)

And now, it's finally time to paint.  But if you're trying this at home folks, there's something I need to tell you first.  My dad would would be beside himself if I didn't mention the most important aspect of a good paint job - as his first business was a painting business and his number one tip to anyone painting anything with a roller is this: YOU CAN NOT USE TOO MUCH PAINT.  LIBERAL, LIBERAL, LIBERAL PAINT APPLICATION.  IF YOU THINK YOU'RE SPREADING IT ON TOO THICK, YOU'RE NOT.  The reason you want to be very generous with the amount of paint you put in each area is that, while you may not be able to tell while the paint is wet, once it dries, the coat will be too thin and you will be able to see through it.  This applies to a wall or these drop cloth curtains.  Another benefit to being plentiful with the paint is that it goes MUCH quicker.  The first panel I did, I was pressing so hard, really using elbow grease and trying to get the most out of the paint - once it dried, there were white transparent spots on the fabric and I managed to go through one roller on three stripes because I was essentially shredding it.  It also took me a lot longer because I was trying to make the paint last for too large of an area.  Just use a generous amount of paint and knock it out in a jiff!

My foot looks so weird!

My foot looks so weird!

After each row/stripe I painted, I made sure to pull the painter's tape up right away.  This is important because if you pull the tape up after the paint has dried, the line will not be crisp.  I can't explain why that is, but honestly, don't question it.  

Sidenote: In the event that you spill paint on a non-paint designated area (which may or may not have happened to me during this process - shh), I did some research and found that spraying hair spray on the spot will get it out.  Since, ok, this did happen to me, and I panicked and put water on it immediately - which you should NOT do if using the hair spray method - my stain did not come out completely but the hair spray helped immensely, which leads me to believe if you spray the hair spray directly on the spot right after it happens, leave the hair spray on there for about 1 min and then use a toothbrush or some kind of scrub brush on the area, it should come out.  

If you're wondering what that seam is, it's because the drop cloth came that way.  The one downside of using drop cloths as drapes is that the fabric integrity is not exactly top-notch.  But, you can barely see it when it's hanging, especi…

If you're wondering what that seam is, it's because the drop cloth came that way.  The one downside of using drop cloths as drapes is that the fabric integrity is not exactly top-notch.  But, you can barely see it when it's hanging, especially since the curtains are creased at the folds.

Obviously, after your paint dries, you are good to go!  I opted for clip rings to hold my curtain on the bar and since I didn't want the metal clips showing, I cut small slits the height of the metal clip down on the inside edge of the fold-over hem at the top, so that I could clip the ring onto the panel behind it and have the clip hidden.

And that's the full process from my perspective :).

I'm very pleased with how they turned out... Much better than I expected in all honesty :).

Both my living room and my pocketbook thank me.  And for that, I feel quite satisfied.

Check back tomorrow for the other project reveal. (SUSPENSE)

Related Posts Plugin for WordPress, Blogger...

Renovation Station

Hey hey party people!  How were your weekends?  Mine was jam packed and even included a Keeley Kraft showing at the Melrose/Fairfax flea market in Los Angeles on Sunday - the closest this SHOP has gotten to brick and mortar.  Woot woot! The experience was... interesting and frankly, a LOT of hard work.  Made some sales (not as many as I would have LIKED :) and got a very positive response on my wares but ultimately, I have determined that I will not be doing it again.  My muscles and my sanity would just not allow it.  So, sorry if you missed it, #itonlylivedonce.  However, if there are any new readers as a result of meeting me yesterday, WELCOME!  Keeley Kraft extends its welcoming arms.

For all of my existing readers, aren't you excited to being seeing something new at the top of this page???? I know, I know, my recent departure from regular posting was still fresh on the books but I had to make SURE my mom's event got the absolute MAXIMUM EXPOSURE possible, you see and so, the second break was necessary...  I knew you would understand :).

I've got a little goodie as a reward for your patience, though.  At least, I think it's a goodie.  I made some "updates" to my living room/dining room area and am going to share the photos.  So, take that to the bank!  I also completed two quite elaborate DIY/Before and After projects during the process and will be showing the details of those in the coming days.  You can see my other post about what the space used to look like, here.

So, without further ado, since I know most of you only come for the pictures anyway :), here are the shots from the best of angles (as taken by m̶e̶ an amateur photographer, with an iPhone - disclaimers officially stated):

Keeley Kraft Dining Room
Keeley Kraft Home
Blue and White Area Rug
Red West Elm Dining Chairs
Rams Horn Candlestick Holders
Safari Inspired Living Room
Wes Anderson Interior Design.jpg
Mounted Elephant Head
Scout Gossip Girl Print.jpg
Army Green Wingback Chairs

And there you have it.  Updates on the home front.  Check back tomorrow as I will be revealing which projects I DID MYSELF and the processes.  It will be very scientific. :)

Week 2 of 2014 is officially kicking off!

Related Posts Plugin for WordPress, Blogger...