This weekend I helped my friend to "antique" (used as a verb) some of her furniture. Despite how it may look from my shop contents, I've never actually done any antiquing myself. My perfectionist tendencies have precluded me from experimenting with the process, based on the extreme fear that I would mess something up in an irreparable way. And thus, when my friend asked me if I would help her antique some of her furniture, I jumped on it. All the fun without any of the consequences? Um, yes please!

She had a dark wood coffee table that already had a slight reclaimed wood feel to it and a wood picture frame that had this fugly faux gold crackle type finish on it. She wanted to make both items more beachy and "charmingly worn" for her new pad which she recently purchased (you go girl!). Our goal was to give the table a kind of white washed antique look for her beach cottage vision. For the frame, we wanted to give it a lighter color that also had some white coming through and looked aged. In my opinion, I think we succeeded spectacularly. A passerby even stopped to compliment our work!
So here is a little DIY "tutorial" on antiquing wood pieces. I must also mention that both projects were completed in a very short amount of time. Double score!
Here is a pic of the pre-antiqued frame finish.

We were silly and thought we had a taken a photo of the table before we began but found out after we were done, that we didn't. So I did some perusing of the internets and found this, which closely resembles said table.

Continuing with my KKTV post, we started with the frame because we knew we wanted to add more paint coats and thought it might take longer to dry. After taping around the inside of the frame (since we did the project with the picture inside), we put on a fairly bright white eggshell wall paint and used a basic paint brush to "casually" (we were trying HARD to adopt a laissez faire attitude for this project because both my friend and I are type A, by-the-book people when it comes to these sorts of things).
After the white paint had dried, we applied a layer of yellow-gold wall paint to the frame. The official term for the application technique we used was "sloppily" and while it may look like we nonchalantly applied the paint in this manner, there was a fair amount of calculation that went into it (which we victoriously disguised, if I do say so myself).
To conclude the frame antiquing process, we took a coarse 60 grit sandpaper directly to the frame after the yellow paint had dried and lightly distressed certain areas of it, paying extra attention to the corners. And abracadabra: here is the finished product:

Just some Subaru product placement :)
Magic! I love it x100!

(We decided not to add a clear wood sealer to it because it came out that good and we figured since it was up on the wall, it probably wouldn't be subject to too much wear and tear, which wouldn't even be a bad thing, if it was).
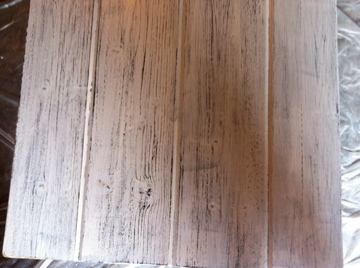
And now, the coffee table. So simple, folks. We added the same bright white eggshell wall paint that we put on the frame using a fatty paint brush. We were a little more meticulous with our application, which felt comforting :), but we only applied one thin coat of paint, so you could see the dark wood coming through the white. Once it dried, we went at it with our same coarse sandpaper (but made sure to go the direction of the wood grain that was already defined in the wood). The hardest part was resisting the temptation to keep sanding when we were already happy with the result. (We added a clear wood sealer after we sanded it, which didn't change the look at all but will help to protect it from whatever its future may hold). Voilà!

Nailed it.
I’m so pleased. Aren't we krafty?